Agony Al: How Can I Get More Editorial with My Makeup?

Make it stand out
YOU ASKED: How can I get more editorial with my makeup?
I asked what type of tutorials you wanted from me this year, and it seems every one of you is enrolling at Euphoria High, because the response was OVERWHELMINGLY in favour of editorial graphic liner.
My New Years rezzy is to break out of my makeup rut (and, as it has been for the past five years, to learn the splits. Maybe this year binge watching Cheer will give me the push I deserve?), and Euphoria-esque liner is the perfect way to do that.
For my first Agony Al of 2022, I’m going to be taking you through a graphic look that is deceptively easy, and perfect for shaking up your makeup routine.
Happy New Queer: like Miss Rona, I’m back again! You can’t get rid of me!
…I really shouldn’t joke about the virus, because everybody I know has had ‘rona.
That isn’t even much of an exaggeration: my sister, my best friend, the host of my favourite club night and probably 50% of the people reading this. Miss Omicron is EVERYWHERE. This look was going to be a New Year’s Eve party makeup tutorial, but I rang in 2022 in the comfort of my own home to avoid getting sick. New variants are frightening! If you take ONE thing away from this silly little column it’s to be sensible and try to keep safe.
___STEADY_PAYWALL__
I’ve been stuck in the house even more than usual, so my cat is never more than 10cm away from me. While Norman was suffocating me today, I noticed how gorgeous her markings are; tres editorial! I took inspo from my furry friend and decided to incorporate Norman-esque shapes into my liner look. Meow!
Was hoping for Cat Moss level posing, but Norman would not cooperate. Go girl! Give us nothing!
Here’s how I did this “cat” eye look (badum tssssh):
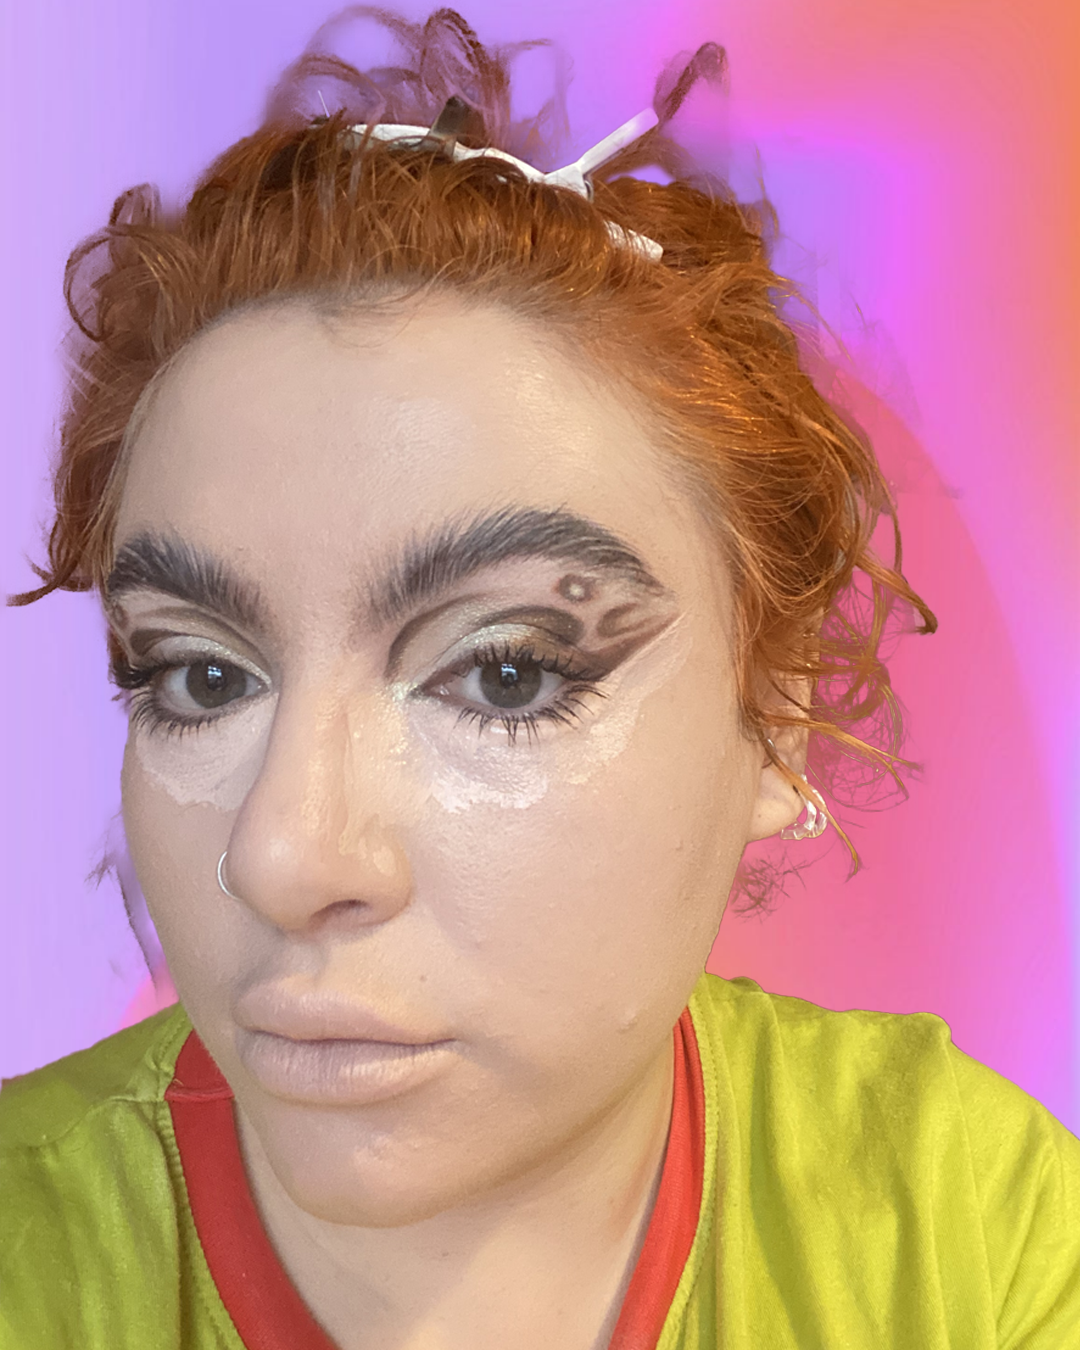
I’m working on my eyes first so that my moisturiser has a good while to sink in, because this look is A LOT OF MAKEUP. Like, three products on my under eye alone makeup. We’re going FULL. COVERAGE.

Coming at you in my Christmas pyjamas because I couldn’t possibly wear proper clothes for a second more than necessary. Hoping my embarrassing pose distracts from the dermatitis flare up I have on me chin.
I start by loading my eyebrows with soap, then finessing them into a shape I like. Then I cover my entire eye in a tinted eyeshadow base to cancel out any redness and attempt to cover the eczema I get on my eyelids. (You’ll see from the pictures that my eye primer tried her best, but she’s no match for my dreadful dermatitis. Alas! The tutorial must go on!)

Charlie Simpson style slug brows. Eyebrows are so personal, so I never really include them in my tutorials, but let me know if that’s something you’d like for 2022?
Next, I use a mid brown pencil - I happened to pick up an eyebrow pencil, but anything from lip liner to eyeliner would work - to start sketching out where I want my liner to be. To work out my placement, I made loads of scrunched up faces in the mirror, making sure that anything I lay down will be visible no matter the position my hooded eyelid is in. I went for a curve that follows my orbital bone, then the beginnings of a winged liner.
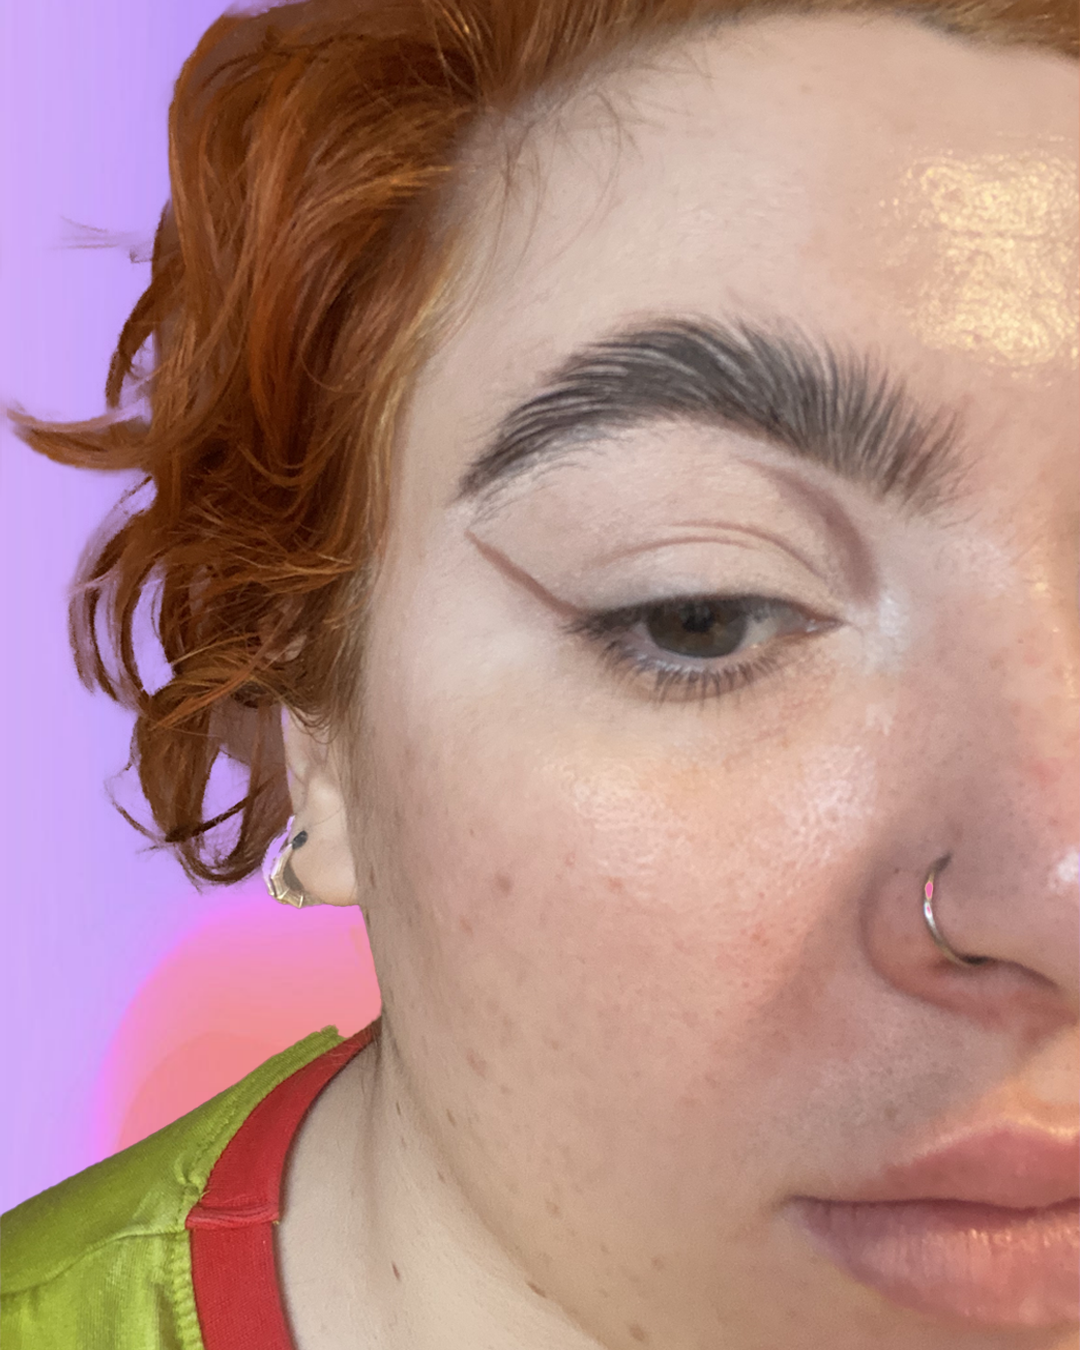
This is like the skeleton of your eye look. A bare bones sketch of where ya liner will go.
Once your initial lines are down, start deepening and thickening them up with brown eyeshadow on a small brush. Nothing has to be perfect just yet, so don’t panic if your shapes look messy.

I think this looks cute by itself, so you could clean the lines up and stop here if you wanted to!
I then sketched in more tabby fur wiggles; a curved line up from the edge of my iris and down, a swoop parallel to my winged liner and a circle below the arch of my brow. I can’t stress enough how little making this neat matters, it’s just about finding positions you’re happy with, and works with your eye shape.
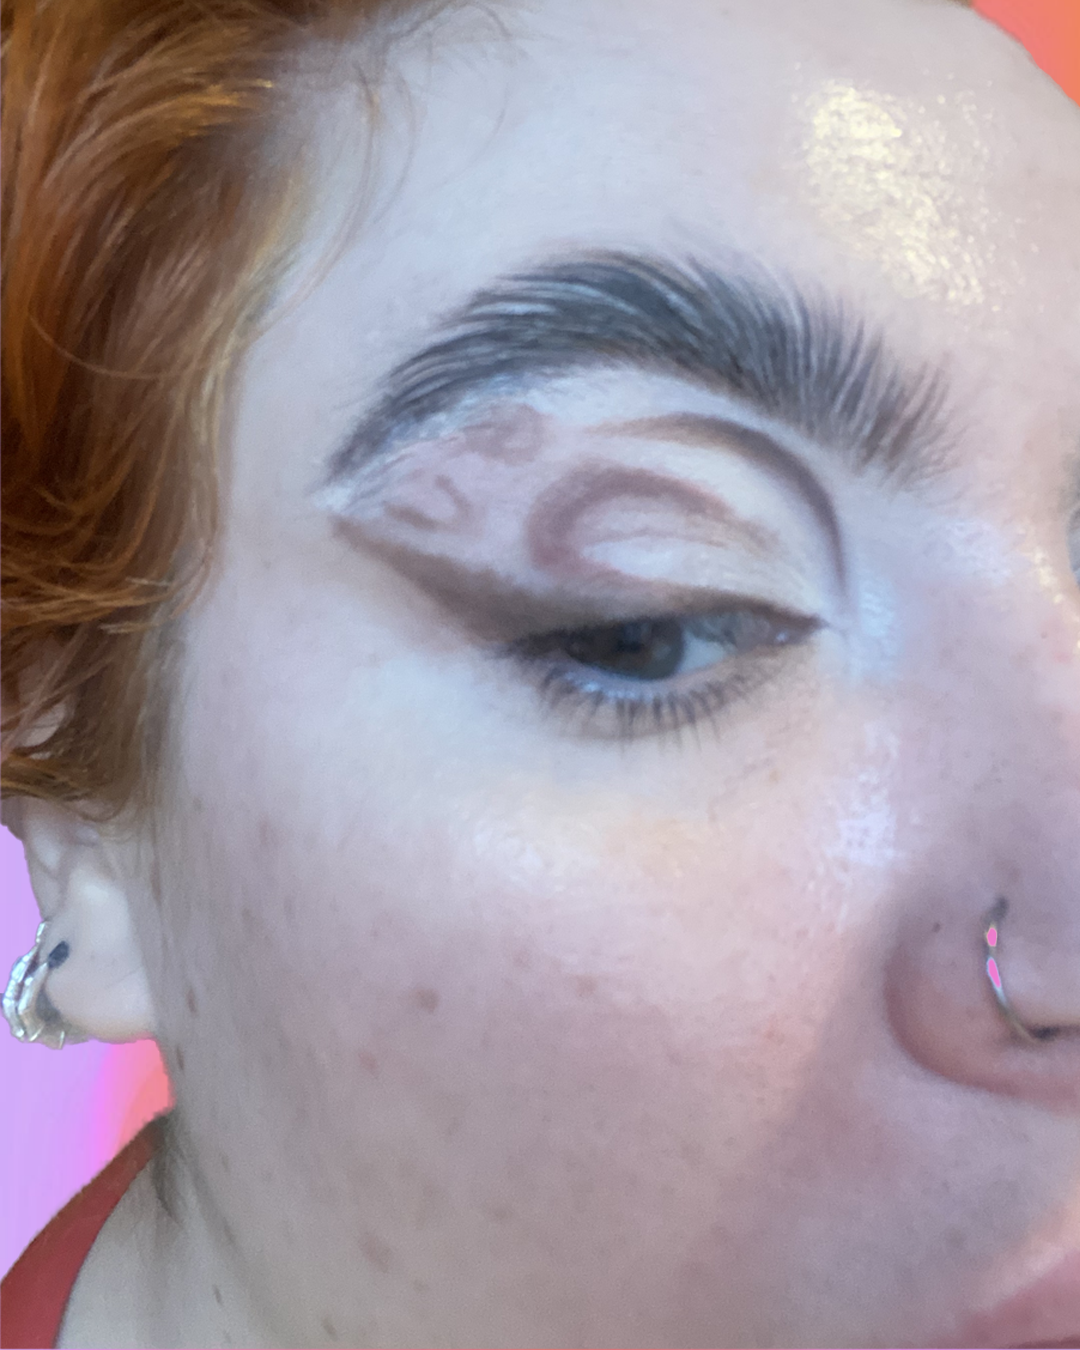
Yes, this looks hideous. Yes, we’re going to clean it up.
When you’re happy with your placement, take your dark shadow and deepen the lines. If you’ve made any mistakes, take a little bit of vaseline on a cotton wool bud or makeup brush and use it to wipe away any makeup. To refine my circle, I spun a vaseliney cotton bud in the centre - it instantly breaks down and sweeps away product, it’s magic!

It should look something like this.
Then take a small, clean brush and use small circular motions to diffuse the edge of the lightest brown, before buffing the two browns together.

I finish off my linework by taking my dark brown shade and perfecting any lines, then using an eyeshadow in a shade similar to my skin tone to clean up any edges.

Normancore
To add some extra razzle dazzle to my look, I popped an iridescent green highlighter on my inner corner, lid and in the middle of all the shapes I made on my eyes. I could feed you some bullshit about the green matching Norman’s beautiful eyes, but that would be a lie… I just like green.

My camera doesn’t capture how gorgeous this shimmery situation is. It’s like an iridescent green reflect. So beaut.
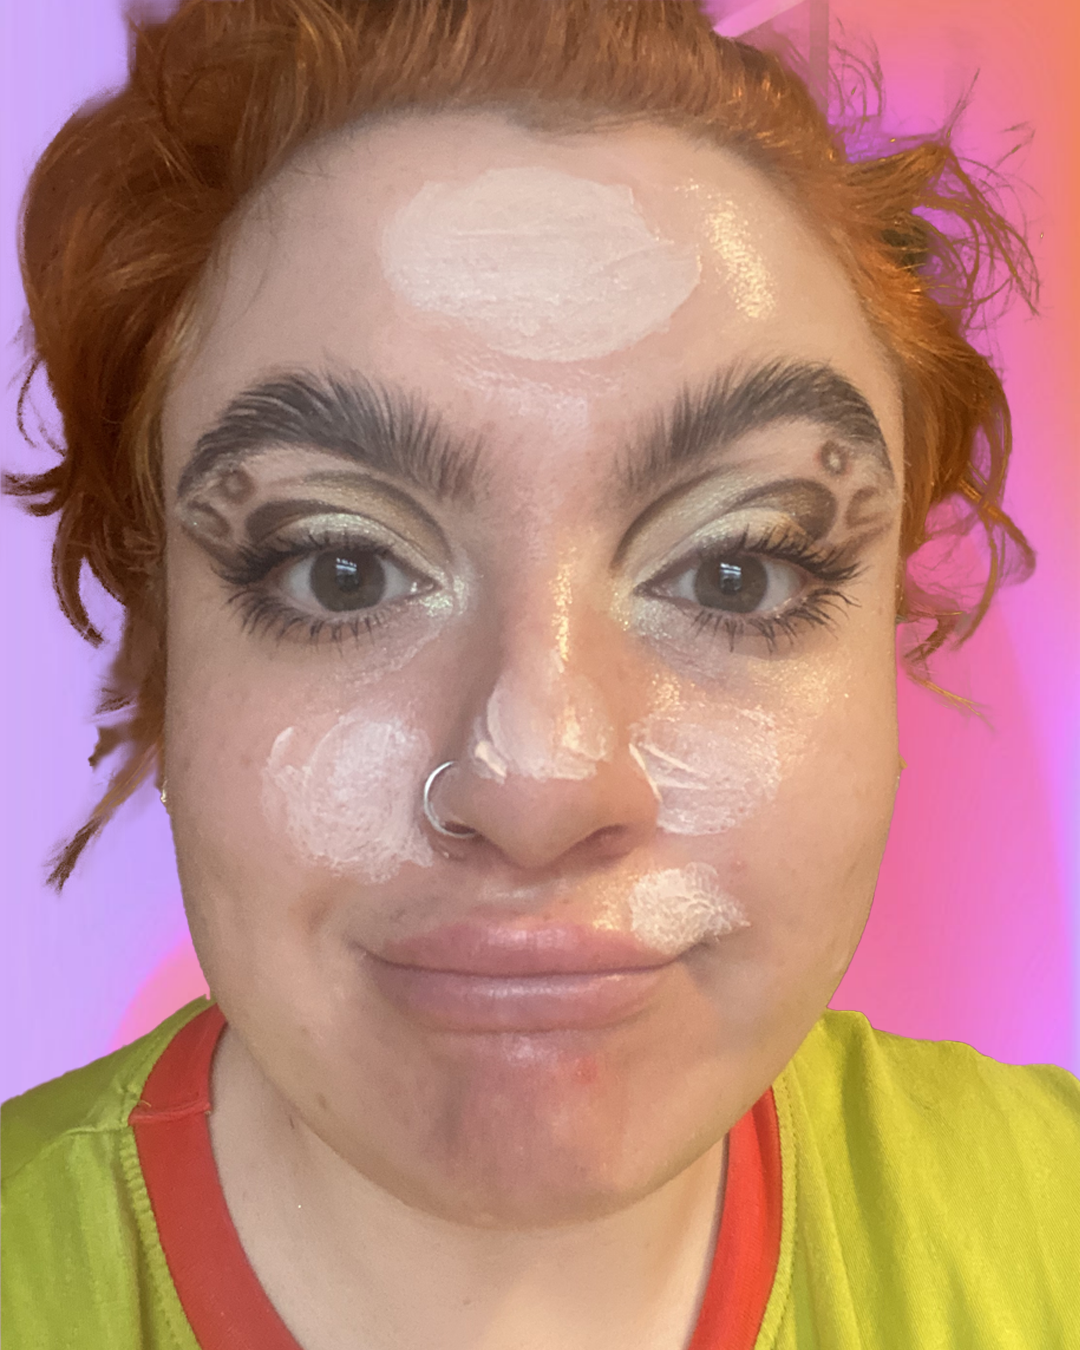
While I’m usually a low-medium coverage, dewy skin, minimal powder typa makeup wearer, I know that there’s readers who love a heavier base, so this look is going to be one for the full coverage girlies or those with oilier skin, because the makeup is LOCKED in.
My skin has been marinating in moisturiser, so I go straight in with a pore filling primer in my most textured areas: the lines on forehead, my pores and the fucking Monroe piercing hole I didn’t believe my mum when she told me I’d regret. I do regret it. So much.
Praying for a miracle here.
I usually avoid powder like my Instagram message requests, but when I’m going for a fuller coverage, I set my primer down with powder. Not only does this help to keep the product contained to the areas I put it, but it also helps to keep oil and sweat at bay. This is my biggest tip for people that struggle with oily skin. SET. YOUR. PRIMER.

Powder ON not UP your nose, even if it is New Year’s Eve.
Next, I dot a matte concealer on my blemishes and scar, then blend out. I prefer to do my heavy duty spot concealing before applying foundation, because I generally use a dewy foundation and never want there to be random patches of heavy coverage, matte concealer.

This is where I place me concealer.
When that’s blended, I go in with a colour corrector under my eyes. I’m going to be doing heavy under eye highlighting for this look, and I notice that I can look almost grey under there if I don’t colour correct before applying my light concealer. It seems counterintuitive to put down a dark, salmon coloured concealer when you’re just going to cover it up, but this will cancel out any of the blue or purple tones I have on my eyebags, meaning I can get an uber bright under eye.

Colour? Corrected.
Foundation comes next, and I bounce it in with a beauty sponge, avoiding where I colour corrected as I don’t want to add an unnecessary layer of product and enhance texture.

Foundation with no concealer feels illegal.
Under my eyes I take a concealer that is similar to my skin tone.
Pretty standard stuff, tbh.
I’m pale and have a massive head, so when I’m doing a heavier glam, I want to avoid looking like a Baybel, my face completely blanked out and devoid of features. When I saw on TikTok that people are using white concealer under their eyes for an ultra bright, chiselled look I just had to try it - the more dimension for my pan head, the better.

it looks snatched but as I'm so pale that isn't quite the contrast of the other TikTok girlies.
I add dimension back into my face with cream contour; hollowing out me cheekbones, adding some colour to my temples, shaping my nose and attempting to draw on a jawline.
The nose contour is … phallic.
Cream highlight and blush are next, I apply them directly on top of each other because that’s the most lifting position.
Then blusher on top so everything is seamless. No weird strips of highlighter here.
Then I set everything down with more powder. TWO LOTS OF POWDER? ON MY CRUSTY FACE? HELL IS FREEZING OVER.

I press my powder in with a sponge on these spots, then use a fluffy brush to diffuse it all over my face, avoiding only the tops of my cheekbones because I like them to remain radiant.
I told you this look involved A LOT of makeup and it really, really does. Powder makes me look a bit washed out, so I repeat all of the cream cheek steps with their powder cousins: highlight, blusher, contour. The only difference in my application with the powder products is that I focus my contour in the centre of my cheekbone. I saw on Tik Tok that this makes for the most realistic sculpt, but my jury’s still out.

This is where you should be focussing your contour according to the Tik Tok girlies. Dunno what my opinion is just yet. Probably that I should stop taking so much makeup advice from unqualified people on the clock app.
The final step to my base is brightening up my under eye (AGAIN). I take an off-white powder - you could use an eyeshadow if you aren’t a professional makeup artist with access to this - and lightly dust it in my inner corner, as well as directly under my eyeliner. Apparently this is very lifting, and I am a slut for anything that’s going to make me look even a day younger. The patriarchy has rotted my brain.

When other people do this it looks SO WHITE. When I do it, you can barely tell. I am Casper the Gay Ghost.
Under eyes powdered, it’s time for lower lid liner. Instead of the brown eyebrow pencil I
used earlier, I opted to use a lip liner, because they’re generally more emollient so won’t tug as much at the delicate eye area. I drew along my lower lash line, then swooped down and added a circle for ~pizzaz~.

If you’re wondering why I went to all the effort on my under eye only to then cover it up.. SAME XX
When you’re happy with your shape, set it with a medium brown eyeshadow.

I was losing faith in my abilities as a makeup artist here, because what the HELL is that circle.
Concealer on a tiny eyeliner brush is your best friend here. Use it to clean up your lines and, if like me you fucked up the outline of your circle, to hollow out.

I saved the look, thank HEAVENS.
Set any of your concealer clean up with an eyeshadow close to your skin tone, before carefully blending out the edges of your lines with the lightest brown shadow. I finished with more of my green highlighter shade, but that’s totes optional.

Blended edges and green shadow applied.
I am a scouse woman so obviously I’m wearing lashes with this look, but I wear ‘em so big they limit my vision, so I’ll pop them on last. It’s time for lips.
I start by applying a nude liner to establish my shape and correct my mouth’s natural wonkiness.

Baboon bum mouth.
Then I blend a dark eyeshadow onto the very edges, and pop a nude lipstick all over.

My go-to lip combo.
I amp it up by adding some light concealer in the very centre.

This is optional, but I love looking like a 90s slapper. Faye from Love Island is shaking at my heavily lined, ombre lip.

Blended out, the lip is actually very subtle and pretty (if I do say so myself)
Last touches are lashes and, because I’m not kissing anybody when the clock hits twelve, lip gloss.

You’re done. You’re done.
I love this look so much it almost has me considering leaving Norman and my leftover roasties to show it off… almost.
Norman, my muse, isn’t as impressed.
If this look has you feeling as apathetic as Norman, don’t worry, my second Festive turorial also had a Euphoria vibe, read it HERE.
Stay safe my angels, here’s to a fabulous 2022
xoxo, Agony Al